Auto Scanning on iPhone: What It Is and How to Use It

Summary :
This article will introduce the auto scanning on iPhone in detail and provide the most powerful alternative to make up sme shortcomings of iPhone Notes.
Table of Contents
What is Auto Scanning on iPhone and How to Use It
Scanning documents has become a must-have skill for everyone in order to share and store files. Whether you want to scan documents to email or need to scan documents for electronic storage, iPhone will be your best choice.
Auto Scan on iPhone makes document scanning very simple. It can automatically recognize documents and quickly capture images, which is essential for people who need to digitize documents quickly and efficiently.
In this article, we will learn in detail what Auto Scan on iPhone is and how to use it.
What is Auto Scanning on iPhone?
The iPhone Scan feature, built into the iPhone Notes app, offers two modes: Manual Scan and Auto Scan. The Auto Scan mode uses the iPhone camera to automatically identify, capture, and scan document images into digital format.
The highlight of iPhone Auto Scan is that it can automatically detect document edges, eliminating the need for manual cropping. And iPhone Auto Scan automatically enhances the scanned image, ensuring that the digitized document has greater readability and clarity, providing faster, more reliable, and more accurate results than manually scanning documents.
With iPhone Auto Scan, you can quickly scan documents anytime, anywhere without the need for a separate scanner.
How to Use Auto Scanning in Notes
Users can easily use a mobile phone to scan and organize documents with iPhone Notes. The whole process is very simple and anyone can complete the scanning task anytime and anywhere.
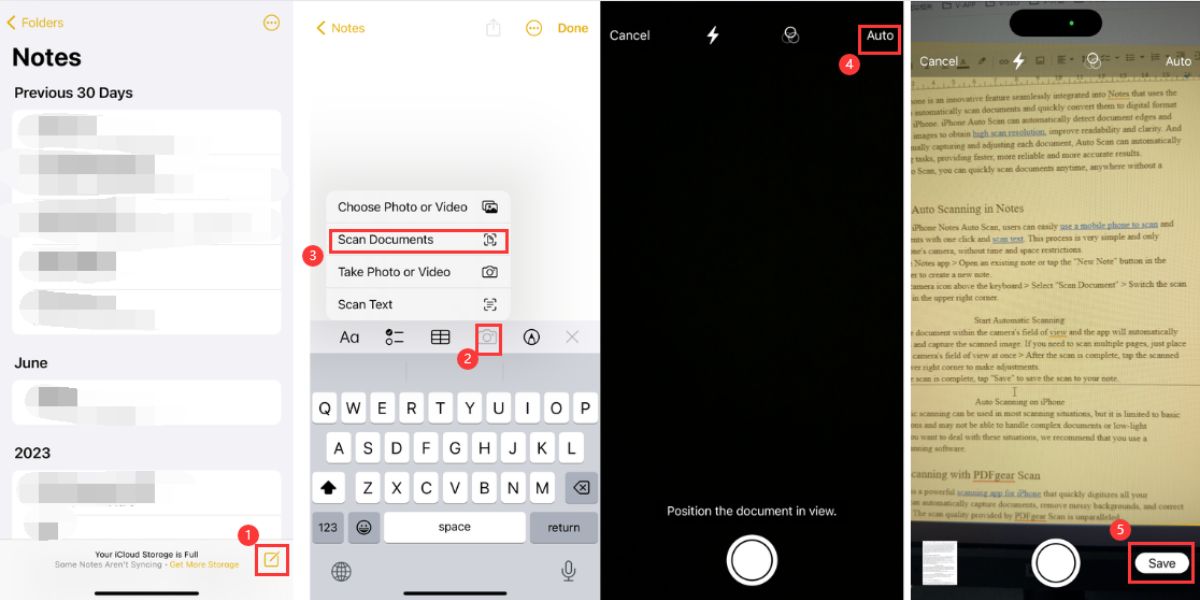
Step 1. Open the Notes app > Choose an existing note or tap the “New Note” button in the lower right corner to create a new note.
Step 2. Tap the camera icon above the keyboard > Select “Scan Document” > Switch the scan mode to “Auto” in the upper right corner.
Step 3. Place the document within the camera’s field of view and the app will automatically detect the edges and capture the scanned image.
If you need to scan multiple pages, just place them within the camera’s field of view at once > After the scan is complete, tap the scanned image in the lower right corner to make adjustments.
Step 4. After the scan is complete, tap “Save” to save the scan to your note.
Auto Scanning on iPhone
But the iPhone’s automatic scanning is limited to basic functions and may struggle with complex documents or low-light conditions.
If you want to deal with these situations, we recommend that you use professional scanning software.
Use Auto Scanning with PDFgear Scan
PDFgear Scan is a powerful scanning app for iPhone that can quickly digitize all your documents. Compared to iPhone Notes, PDFgear Scan is more suitable for some complex situations.
In addition to automatically capturing documents, PDFgear Scan also supports removing messy backgrounds and correcting tilt in one step.
What’s more, PDFgear Scan also supports storing scanned documents in multiple formats, including PDF, WORD, and images.
The scanning quality provided by PDFgear Scan is unparalleled, and most importantly, it is completely free and does not require any subscription.
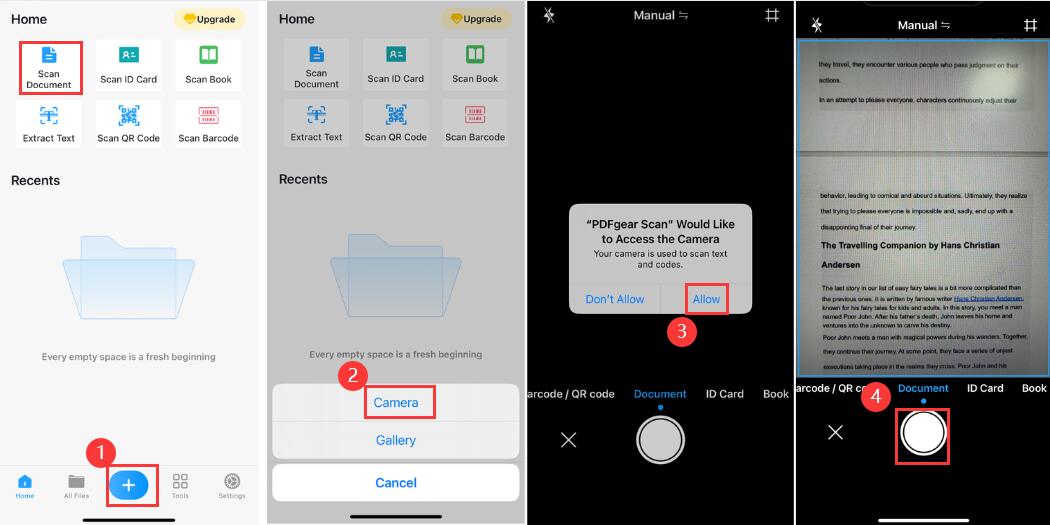
Step 1. Search and install PDFgear Scan in the App Store.
Step 2. Open PDFgear Scan > Tap “+” or “Scan Document” at the bottom of the screen > Select “Camera” > Allow PDFgear Scan to access your camera > Place the document in the viewfinder > Tap the photo button to scan the document.
Scanning Document with PDFgear Scan
Step 3. After scanning, tap the “>” button in the lower right corner > Edit the scanned document by adding filters, cropping, or rotating > Tap “Done” > Tap “More” to choose how to save.
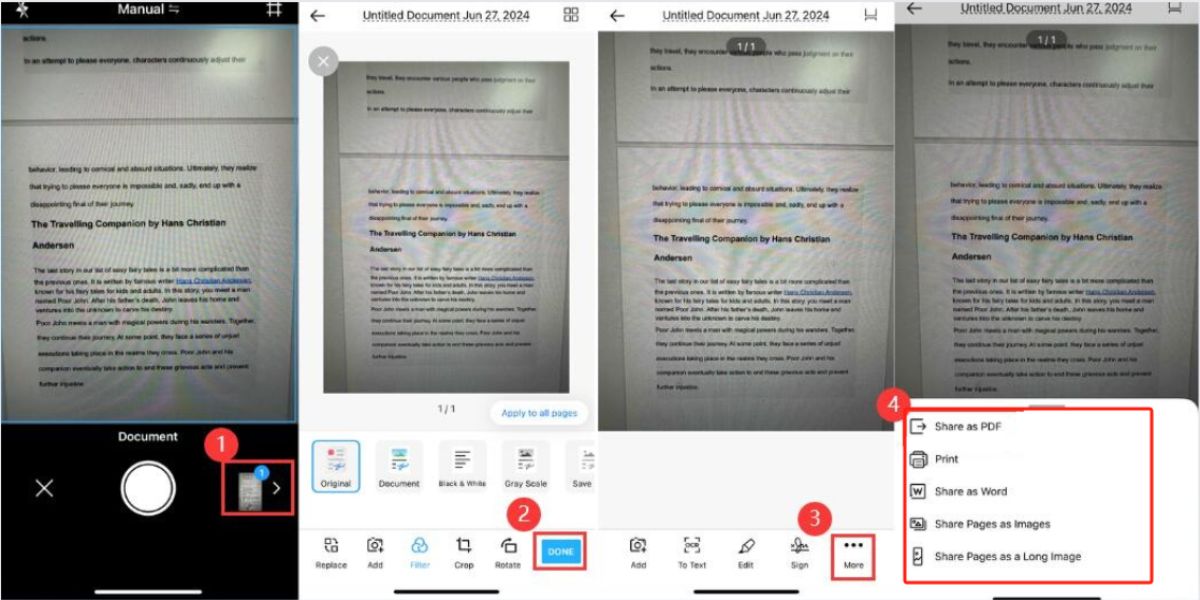
Save Scanned Document
In addition, PDFgear Scan also provides a series of advanced features that go beyond basic scanning. Edit scanned images with just a tap, add signatures. Cutting-edge OCR technology allows users to accurately extract text from documents.
At the same time, PDFgear Scan also provides flexible sharing options, so that scanned documents can be shared with anyone in various formats.
FAQs
Where is the scan setting on my iPhone?
iPhone supports two modes of scanning – automatic and manual. You can adjust it in the upper right corner of the Notes scanning interface.
What is the purpose of scan text on iPhone?
Scanning text on your iPhone allows you to convert physical text documents into digital documents for easy organization, management, storage, and sharing.
Can I use auto scanning on iPhone without an Internet connection?
Yes, Auto Scan on iPhone can work without an internet connection. In any case, just open iPhone Notes and turn on the automatic document scanning mode to digitize the document.
What file formats can I save scanned documents in?
Generally, documents scanned in iPhone Notes are saved directly to Notes. If you need more other formats, it is recommended that you use PDFgear Scan.
PDFgear Scan supports saving scanned files as PDF, Word, or image files
Can I scan multiple pages into a single document using auto scanning on iPhone?
Yes. We recommend you use PDFgear Scan. PDFgear Scan can seamlessly and smoothly scan multi-page documents into one PDF. The scanning speed is fast, the quality is high, and it is completely free.
In addition, PDFgear Scan also supports editing scanned PDF files, such as inserting signatures, extracting text, etc.
Conclusion
Automatic scanning on the iPhone is a powerful feature that allows for quick and efficient document management.
For those who need more advanced features, PDFgear Scan offers a powerful solution that enhances the scanning experience. Both options are well worth a try.