How to Scan a Photo from Gallery on iPhone and Android
Summary :
Learn the 2 ways to scan a photo that has already been taken from your gallery. You can straighten the photos, apply filters, or make other edits to the scanned photos on iPhone and Android.
Table of Contents

Scanning a photo can straighten the skewed image, making it easier to edit the document. Moreover, it captures text from the photo, allowing you to store the content in different formats.
If you can’t retake the photos, a gallery scan for existing pictures becomes crucial. Since not all the built-in scanners of your phones support scanning images from the camera roll, we’ve tested several quick and affordable methods to meet your needs effectively.
How to Scan a Photo from Gallery on iPhone with a Free Scanner
PDFgear Scan is a professional photo and PDF scanner for iPhones. It enables scanning from the gallery and camera, complementing the cases when your Notes app is not able to upload images from the gallery.
The crop feature allows you to adjust the photo and straighten it from a weird angle. Here’s how to scan an existing photo with this scanner.
Step 1. Get PDFgear Scan from App Store on your iPhone or iPad.
Step 2. Launch PDFgear Scan. Tap the plus icon (+) at the bottom center and choose “Gallery.” Select the photo(s) you want to scan and tap “Done.”

Tap Gallery in PDFgear Scan
Step 3. When the photos are open, add a filter to them or rotate them if necessary. To straighten the photo, tap “Crop.” Move the blue points and lines to deskew the scanned document.
Step 4. After straightening, tap “Done” at the lower right to add text to the image or sign the scanned photo.

Straighten the Scanned Photos
Step 5. When all editing is done, tap “More” and choose the way to share or save your new file.

Save the Scanned Photo
Apart from photo scanning, PDFgear Scan also makes the scanned pics into PDF or Word. The advanced OCR tech facilitates accurate information recognition and extraction.
How to Scan a Photo from Gallery on Android with Microsoft Lens
Microsoft Lens is a powerful scanning app known for its efficiency and high-quality results.
Compatible with various devices, this scanner is perfect for both personal and professional use. It allows you to scan photos directly from your gallery, ensuring accurate digital copies.
The cloud-based services in Microsoft Lens can sync your documents, making photo management easy and reliable.
Follow the steps to scan a photo from the gallery in Microsoft Lens:
Step 1. Download and install the Microsoft Lens app on your device, then open the app.
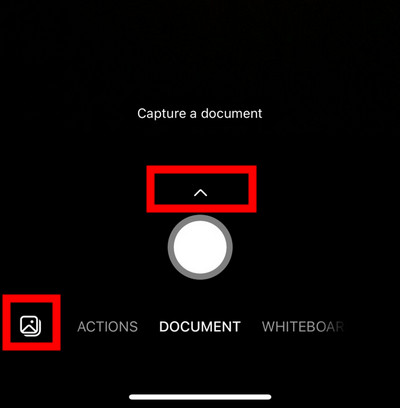
Step 2. Tap the gallery icon located at the lower left corner or tap the up arrow above the shutter button to select the photos you want to scan.

Choose a Photo from Gallery
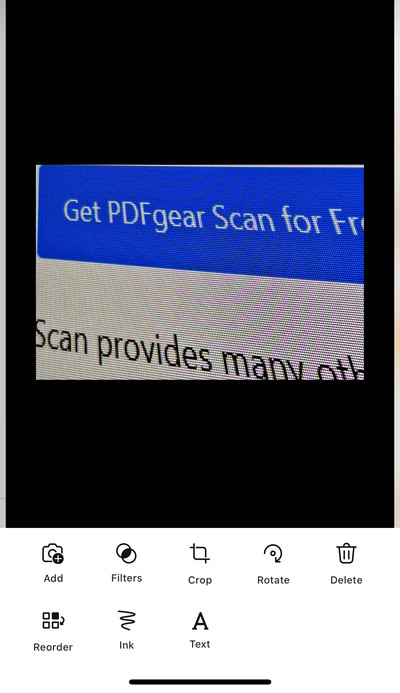
Step 3. After selecting your photos, tap the right arrow button to access the editing toolkit. You can apply filters, add text, and make other photo adjustments here.

Edit the Scanned Photo in Microsoft Lens
Step 4. Once you have finished editing, tap “Done” and choose the option to save the photos to your device or share them.

Tap Done to Save the Edited Photo
FAQs
How do I scan a photo to text from the gallery?
To scan a photo to text from the gallery, you can use PDFgear Scan. The advanced OCR technology it is equipped with can quickly and accurately recognize the text from the document, allowing you to copy it or convert it to Word.
Is it possible to scan a photo to PDF from my gallery?
Yes, it is possible to scan a photo and save it as a PDF from the gallery using apps like PDFgear Scan or Microsoft Lens on iPhone, Android, or tablets. Take PDFgear Scan as an example, it supports exporting the scanned documents to PDF, image, and even Word for various sharing requirements.
Can I scan a photo from my gallery and convert it to grayscale?
Yes, you can scan a photo from the gallery and convert it to grayscale with PDFgear Scan. This app lets you apply different levels of grayscale filters to a photo or make the photo black and white.
How to scan a photo from gallery and email it on iPhone?
You can scan a photo from your gallery and email it on your iPhone using PDFgear Scan. This app is dedicated to iPhone users, offering scanning capabilities from both the gallery and camera. You can save scanned documents as PDFs, images, or text files and share them via email.
